Why use a Blush?
Blush is probably one of those make-up trends that is seen as an add-on and not something complete on its own. If you folks are historical fiction fans like myself, you would know how women were asked to pinch their cheeks to add that dash of color to their delicate complexion (Regency era had creative solutions folks, don’t look at us). Thankfully, we don’t have to resort to anything of that sort, since we have some much needed products at aid that would guide us in our quest of how to apply a blush perfectly.
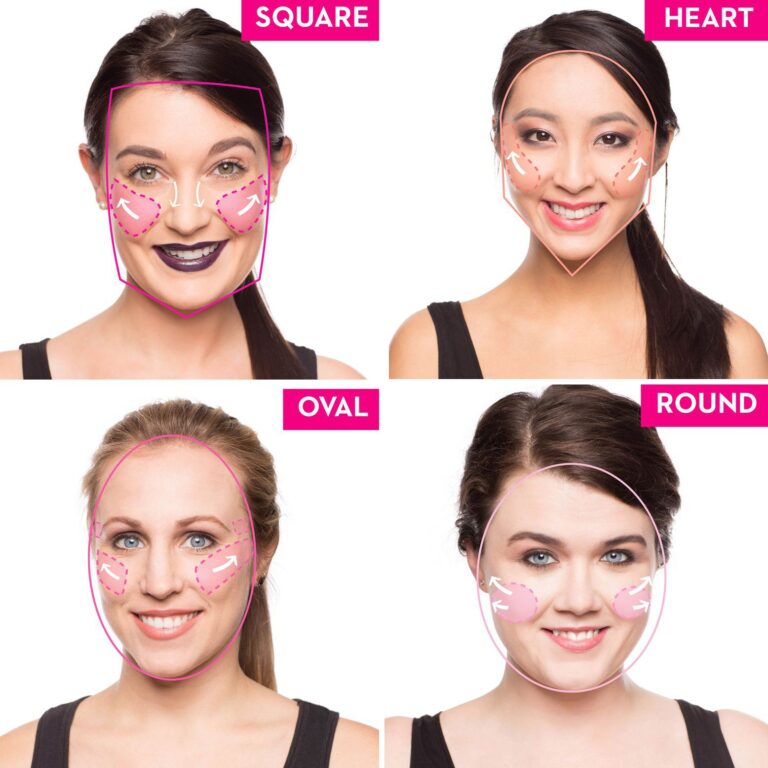
How to apply Blush according to the face shape?
This is a valid question to ask. Blushes are meant to accentuate your features, which would mean that they have to be applied based on your bone structure.
Heart-shaped face:
If you have a heart-shaped face, with a wider cheekbones that would narrow down to a pointed chin, heads up on applying blush in an upward position. Make C shaped application to reach them up to the end of your temples.
Round face:
For a round face, the cheeks would often be the fullest part of the face and the chin would be curved. We suggest you to determine the best part by giving yourself a smile in the mirror and highlight the apple of your cheeks. The motion you’ve to make with the brush should be two-way: both upward towards your temples and downwards towards your earlobes whilst using a medium sized strokes with your chosen brush.
Square face:
If you have a face shape with a flat jawline and straight sides, you most likely have a square face. For a square face, the motion of blush should be blended upwards, starting from the beginning of your cheekbones, going towards the hairline, covering all of the cheekbones.
Oval face:
An oval face usually has a narrow fore-head and a narrow chin with prominent cheeks. If you have an oval face, we suggest you to use upward strokes starting from your cheekbones, moving it towards the temples. The difference however, would be blending it a bit higher, just above the temple/ow
Blush shades according to your Skin tone
Of course, it can’t be a one shade fit all situation, when you want to apply blush. Although we might not be able to cover all of the skin shades that are ever present, we can give you an idea to see which shades of blush would suit you perfectly. Once you choose a color that will go with your complexion, you could experiment by playing around with the brighter shades or sober based on your comfort.
The best way out there is to pinch your cheeks (Ha, Regency era folks were right about something after all) to find your natural blush color. However, if you are not a fan of the age old technique, you can take this as a reference point to go forward.
Pale skin
For Pale skin, our best bet is to choose colors that won’t overpower your skin tone. Our recommendation is COVERGIRL Cheekers Blendable Powder Blush Natural Rose. It is important to choose a pale color so that the blush would look natural and would not stand out and look garish.
Light to medium skin tone
For light medium skin tones, choose a peachy color that will give a nice glow to your skin. Since peach is a universally flattering color, when in doubt, go for the standard color. Our pick is NARS blush in Orgasm that really works wonders on any skin type, but particularly on medium complexion.
Oliver or golden skin tone
For olive or golden skin tones, choose shades which are brighter. Punchier pinks are our favorite ones for these complexions. We recommend Revlon Cream blush in flushed, which is our go to product.
Darker skin tone
For darker skin tones, we recommend the likes of Milani Baked Blush, Coralina. While the shade looks brighter, we assure you it would not stand out to look odd on the skin. Rather, shades such as these would blend well, making you look ethereal.


Blush shades according to your Skin type
One of the common concerns of make-up beginners is their concern in the make-up products not suiting their skin. We would recommend you to choose your product wisely based upon your skin type. The best part about blushes are that they come in three different modes: creams, powders and stains.
For those of you with a rather oily skin, we recommend you to try cheek stains. Cheek stains are our favorite for their longevity in wearing them. Also, if you worry about sweating regularly, this is a perfect match for your skin type.
If you have a combination skin type, neither too dry, nor too oily, we recommend you to use cream based blushes. The best part of this variant is their variety and huge choice you have in selecting a product. Cream blushes also tend to give your face a youthful look.
Do not fret if you have a dry skin. Powder formulae are for you! Although a common misconception is that stains and creams suit dry skin more, the reality is quite the opposite. Choosing a powder would be better for your skin. This is because it is easier to glide it across your pores for blending it better. Creams and stains on the other hand are more likely to crack on dry skin, make them look cakey.
How to apply Blush?
Now that we got the main concerns out of our way, here’s the steps to follow to master the perfect blush.
Step one: Preparing the skin
Like always, we strongly recommend to do your skin care first. Dry skin does not hold make-up for a long time. This is why we recommend you to wash and moisturize your face prior to applying makeup. For you to be able to wear make-up without worrying about damaging your skin, a proper skin care routine is essential. We answer your burning questions about skincare and makeup here.
Start off by using a moisturizer. Apply primer right after. This will help in holding your makeup in place. A primer is always a great investment since it preps the skin. If you do not own one, check out Rimmel Fix and perfect primer.
Step two: Blush it up
Blush is the all-rounder of products as far as make-up products go. While you apply blush over your cheekbones, follow the pattern that suits your face-shape the best. Additionally, you can also use the same blush on your eyelids, if there is a leftover. Dab it and blend to make it look more natural.
Step three: Setting the look
You could either go for a translucent setting powder to finish your look, or use the classic method of dabbing your blush with a napkin, or a makeup sponge to absorb any excess usage of the product.