If you are a beginner in make-up, chances are you would be left with more confusion than ever after watching a tutorial with the excess choice in terms of both make-up products and styles. We have all been there at some point, and we are here to help you navigate through the plethora of options in choosing the products, and assist you in the application of them as well.
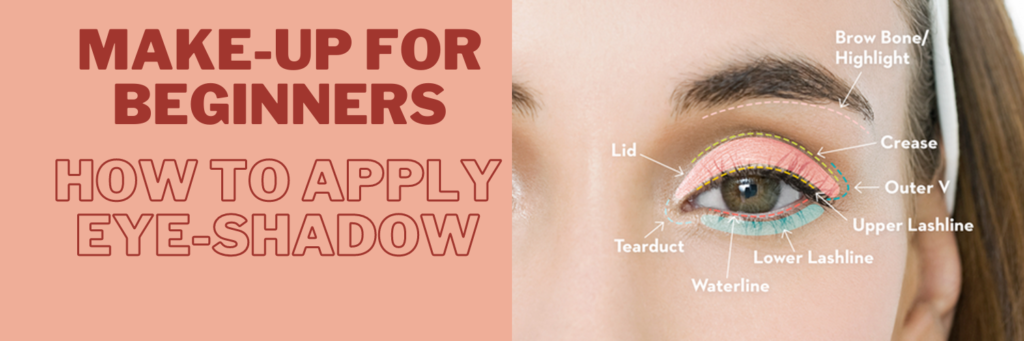
Steps to follow before applying an eye-shadow
Start with a Primer
Using a primer that is a shade lighter than your skin tone is recommended. Use a translucent powder on the top of your primer to set it up, before you use an eye-shadow. Not only will this create an even-base, it would also enhance the look of your eye-shadow and make it look more pigmented.
Blend your eye-shadow
One of the mistakes you could do when you are new to applying an eye-shadow is using a windshield motion while applying the eye-shadow. We would recommend you to blend it instead by using tiny circular motion. This is a key part of your application, since blending it well would give a better look and ensure the color is evenly distributed across.
Picking the right shade
Pick a color that is right for you, based on the look that you want to opt for. For a natural look, we recommend you to pick a color that is a shade or two darker than your skin tone. However, if you are going for a more dramatic look, you could opt for darker shades. Go for a lighter tone on the base and a darker shade for the corner of the eyes.
No Eye-liner
Eye-liner could be your comfort zone, but trust us on this. For a smoother finish, you are better off using eye-shadow with a brush. Use an angular stroke and darker shades; either black or dark brown eye-shadow closer to the lash line for a smoother and natural finish.
Master the crease
Mastering the crease could be the tricky part. Our tip is to tilt your head while applying, and look down at the mirror. This way, the entire surface area of your eyes would be visible, making it easier for you to apply the eye-shadow in this tricky area.
Take a big-leap from a mere eye-liner to eye-shadow by experimenting with the three styles we charted out for you.
Natural eye-shadow
This is a great place to start experimenting, especially if you are not used to wearing make-up more regularly.
To begin with, use an eye-primer to set the base. You can also use a concealer, if you do not have an eye-primer handy. Next up, use a natural eye-shadow palette such as Revlon Illuminance Crème Shadow. While trying a natural look, try and limit the application from your lash line up to your crease and ensure it does not go beyond. Use a brush to blend, and ensure no harsh lines of demarcation are created.
If you want a bright wide-eyed look, try applying a bit of shimmer only on the center of your lid, where your pupil rests when you close your eyes. You can pair it up with a slight touch of color as well.
Add an eye-liner to show the contrast. Use a liquid eye-liner to line your eyes better. Leaving the lower lash line bare, while applying the liner only to the upper line, makes your look apply more natural. Add a dash of mascara to your lashes to finish this look.
Halo eye shadow
This is perhaps the easiest to apply for first timers since most beginners intuitively apply their make-up in a halo shape because it is commonly the natural way to apply.
Halo eye makeup is most popular since it ensures your eyes look rounder and bigger, by using a sandwiching technique of color, with the bright colors placed in the center of the eye-lids, making your eyes pop.
Application of this look starts with a primer, to make your eyes look bright and big form the start. Choosing a right primer is a key step to keep your make-up in place and to ensure it does not crease.
Once your primer dries, choose a neutral color next to blend it from the bottom of your eyelid to your crease. This would work as a great foundation to the color you would apply next.
This is the exciting part because there is room to experiment. If we divide the colors into four categories; light, medium, neutral and dark, you can experiment playing on the contrasts. If you are feeling confident, throw in a bit of glitter against matte to bring that demarcation even better. Follow the thumb rule of placing neutral or light colors across the crease, medium shades along the inner third of the eyelid, and blend it with darker shades later.
Work with applying color on the center of the eyelid after darkening the inner and outer areas of your eye-lids. Mimic the same placement along the lower lash line.
Blend the colors after applying using a suitable brush. Choosing the right brush is as important as applying the make-up itself. More about it here.
We recommend you to use larger fluffy brushes while using a softer color to blend as opposed to using tapered blending brushes for darker shades.
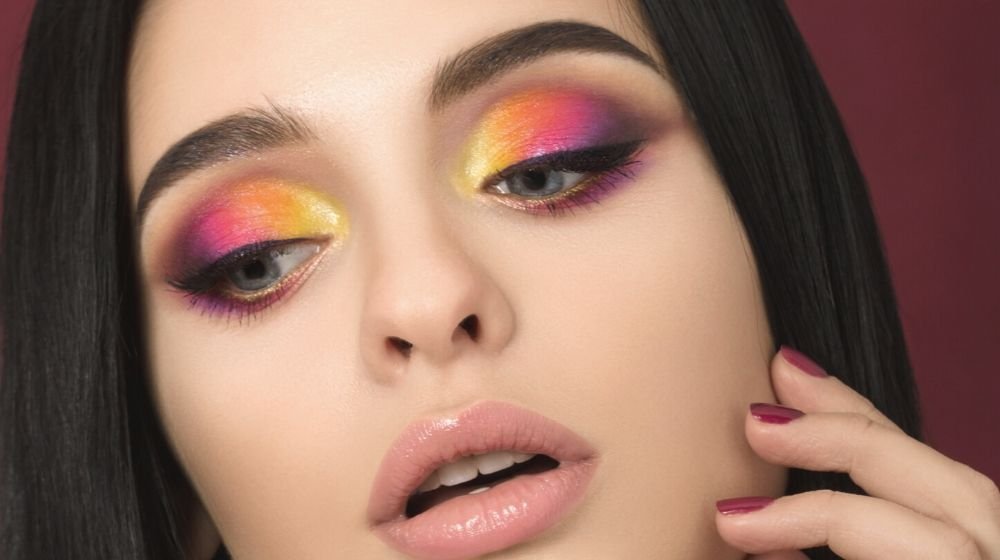
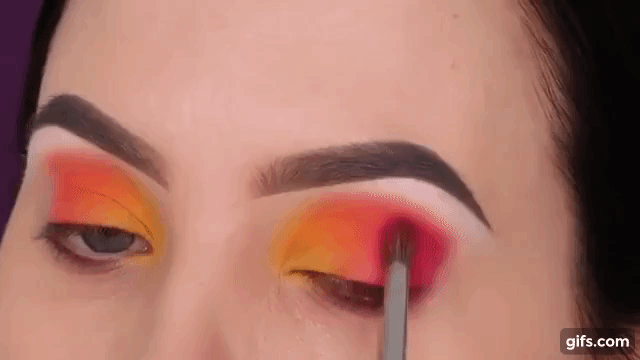
Ombre eye-shadow
This look might sound daunting to try on for first timers. But the beauty of this look lies in the flexibility it offers you to experiment. Start with a primer for this look, to be a perfect base for the colors you are going to use on the top of it. Picking the right primer is important which will cover your veins and discoloration but also would enhance the pigmentation when the eye-shadow is applied on the top of it.
Start with a matte-white eye-shadow on your brow bone that would give your eyes a lifted look as well as brings definition.
Pick the lightest of the colors for the inner corner of your eyes. Apply it with a stronger emphasis on the corner of the eye and lighten its application to show it fading out.
Pick the next color and start from the middle of the eye lid, and sweep it gently to ensure it blends smoothly with the previous light color. Have the brow bone eye-shadow act as a boundary when you work with your application.
Pick a third color which is a darker shade and start contouring from the middle of the second color. Leave enough room for a crease color.
Blend in the crease and shape the eye-shadow based on the shape of your eyes. For a dramatic effect and to make your eyes look bigger, extend the tail end. Line the look with an eye-liner to bring definition to the look. For a gradient look, you can add a bit of black eye-shadow on the eye-liner.
For a smokey eye look, you can add ombre eye-shadow at the bottom lash. To set it in place, you can add a black matte eye-shadow.
Comments
2 responses to “How To: Apply Eye-Shadow for Beginners”
Nice! I like the smokey eye but I struggle to find the right shade for my eye colour. Might try the bright-coloured one like in the gif haha
Amazing! this really helped me understand where i was going wrong with eye-makeup! great blog